Flyway migrations with Spring
Flyway is an open-source database-migration tool that can be configured into your database-using application. Depending on your project’s nature and its requirements, it may not always be advisable to rely on completely automated tools for generating database structure, like hibernate auto create. Sometimes, we want to have more control – not only to shape the database as we see fit, but also to later manage its versioning. It’s especially important with more complex databases in projects with focus on reliability. Flyway helps us organise and manage our custom SQL migrations, with vast options for configurability.
The concept of Flyway
Flyway resolves seven basic commands: Migrate, Clean, Info, Validate, Undo, Baseline and Repair. Upon running, it creates an additional table in our database named flyway_schema_history, where it stores all run migrations data, including version, time, script name, script checksum, migration status and others. It uses this data, together with actual scripts in the specified location in the project, to determine the general status of the database.
When working with flyway, we simply add our custom migrations to the specified location, naming and versioning them accordingly, and then run the migrate command, either by command line or on application start-up. I will go into detail about the commands in the further section.
Flyway migrations
The default scripts location is classpath:db/migration, so in Spring we usually put pure SQL files under the resources/db/migration directory. There are a few types of migrations. Flyway recognises specific types by filename conventions.
Standard, versioned migrations
These migrations follow the naming convention V<Version>__<name>.sql, for example V1.0.1__create_user_table.sql. They are run only once, and they usually contain SQL creating tables and other objects. Upon migrating, Flyway compares the content of flyway_schema_history with the scripts in the specified location to determine which should still be run. The run order depends on the version part of the script name.
For example, if we have the following scripts:
- V1.0.1__create_user_table.sql
- V1.0.2__adjust_user_table.sql
- V1.0.3__create_task_table.sql
The migrations will be run from the top to the bottom. If before running the migrations flyway_schema_history already contains information about a migration “V1.0.1__create_user_table.sql” having been successfully run in the past, only the last two migrations will be run.
The example content of the versioned migration could be as follows:
CREATE TABLE user
(
    id        BIGINT(20)   NOT NULL AUTO_INCREMENT,
    email     VARCHAR(100) NOT NULL,
    password  VARCHAR(255) NOT NULL,
    join_date TIMESTAMP    NOT NULL DEFAULT CURRENT_TIMESTAMP,

    PRIMARY KEY (id),
    UNIQUE KEY UK_user_email (email)
);
These migrations are meant to be run only once. To assure database consistency, flyway validates whether checksums of the already run migrations (stored in the flyway_schema_history table) match current versions of the scripts. If we edit the script for an already run migration, flyway will fall into an inconsistent state, not allowing us to run migrations until the situation is resolved:

The fix is either to revert the changes to the script, or if we are sure that the actual state of the database matches the modified script, run the flyway repair command, which will realign the checksums.
Repeatable migrations
These migrations follow the naming convention R__<name>.sql, for example R__fill_task_table.sql. They don’t have versioning, because by default they are always run last. They are run each time their checksum changes. This means we can freely edit these scripts, and they will simply be rerun. We usually use repeatable migrations for seeding data.
The example content of the repeatable migration could be as follows:
DELETE FROM task where name LIKE 'Test name%';
INSERT INTO task(name, description) VALUES ('Test name1', 'Test description1');
INSERT INTO task(name, description) VALUES ('Test name2', 'Test description2');
Undo migrations
If we want to use flyway’s undo command, we need to add undo migrations. These special migrations must be named exactly like the corresponding versioned migrations, except we change the leading V to U, for example U1.0.1__create_user_table.sql. The content of the undo migration must revert changes done in the corresponding versioned migration.
The example content of the undo migration could be as follows:
DROP TABLE user;Undo migrations are not supported in the community edition of flyway.
Baseline migrations
These migrations follow the naming convention B<Version>__<name>.sql, for example B2.0.0__create_basic_tables.sql. They are a special kind of versioned migration, which serves as an aggregation of the previous scripts up to a certain version. This option allows us to streamline multiple migrations we were adding and modifying during development process into a single, simplified one.
If we have the following scripts:
- V1__create_user_table.sql
- V2__adjust_user_table.sql
- V3__create_task_table.sql
- B3__create_basic_tables.sql
and we run the migrate command on a fresh database, then only the baseline migration will be run.
Flyway commands and the maven plugin
Let’s now focus on the flyway commands themselves.
We usually call flyway commands from the terminal, using a command line tool. There is a dedicated tool available, however a good alternative is the flyway maven build plugin.
 <plugin>
        <groupId>org.flywaydb</groupId>
        <artifactId>flyway-maven-plugin</artifactId>
        <configuration>
            <url>jdbc:mysql://localhost:3306/database</url>
            <user>username</user>
            <password>password</password>
            <locations>
                <location>classpath:db/migration</location>
            </locations>
        </configuration>
    </plugin>
With a correct database configuration and a built project, we can then call our commands this way: mvn flyway:<command>, for example: mvn flyway:migrate.
migrate
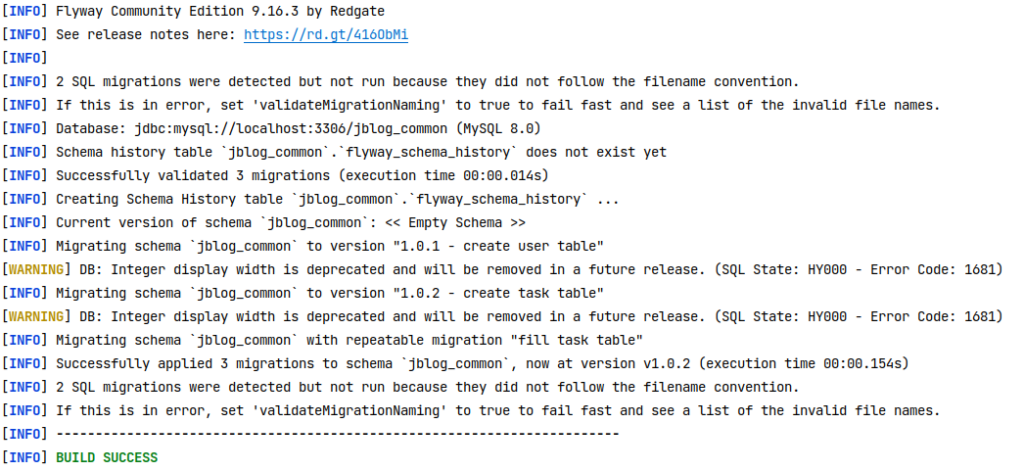
This command will make flyway compare the flyway_schema_history table to the current scripts to determine whether checksums match and whether there are any pending migrations, following the rules for specific migration types. If there are migrations to run, they will be run in the order of the versions, with repeatable migrations last. If the database does not yet contain flyway_schema_history table, it will be created.
An example output for a clean database:

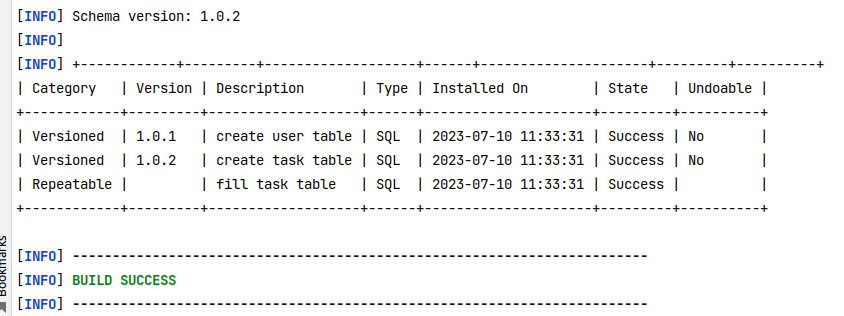
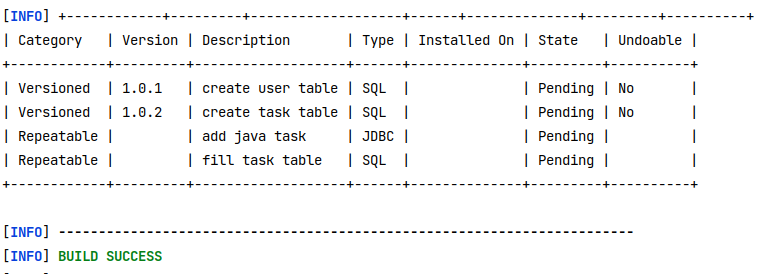
info
This command will make flyway compare the flyway_schema_history table to the current scripts and return the migrations’ status in a human-readable format.
An example output for a clean database:

An example output when there are no pending migrations:

An example output when there is a failed migration:

repair
This command will realign migrations scripts’ checksums in the flyway_schema_history and remove from it all failed migration rows. This doesn’t fix the scripts themselves. This is a command we run after we’ve fixed the scripts issues, to remove flyway from a fail state.
An example flow: – We have a database with 2 correct migrations already run, and a new migration C pending. There is an sql syntax error within the C script. – We run the migrate command and it fails. We get information about why it failed, and there is now a fail migration row in the flyway_schema_history. Flyway is now in a fail state and won’t allow further migrations, as it cannot guarantee that the database is in a consistent state. – We manually fix the migration C and remove potential side effects from the database. – We run the repair command, which removes the fail row. – We now run the migrate command again which works correctly.
An example output for the repair command:

clean
This command cleans the database schema, removing all tables, including flyway_schema_history. This command is disabled by default – in the testing environment, where it can be useful, we have to manually set flyway property cleanDisabled to “false” to enable it.
validate
This command will perform all the analysis and validations of the migrate command (checksums, namings), but without actually running the migrations. It’s useful for detecting any unexpected changes to the scripts that could lead to invalid database recreation on a different environment.
baseline
This command, intended to be run on an existing schema, will take the flyway’s property ‘baselineVersion’ and tag the database with it, creating flyway_schema_history pointing to a specific version. Migrations of the versions below the baseline version will not be run on such a database.
undo
This command allows to undo the last applied versioned migration. It requires the presence of an undo migration corresponding to the versioned migration. This command is not supported in the community edition of flyway.
Flyway configuration
Flyway has various configuration properties that can alter its behaviour. Most importantly, one must configure the datasource and set the migration scripts location. Here are possible options for a Spring project, ordered by precedence:
- We can set system properties when running the project with maven:
mvn -Dflyway.user=username -Dflyway.password=password -Dflyway.url=jdbc:mysql://localhost:3306/database - We can create an external configuration file flyway.conf in the project root containing the properties:
flyway.user=username
flyway.password=password
flyway.url=jdbc:mysql://localhost:3306/database- We can set maven properties, either in pom or in yaml profiles.
  <properties>
        <flyway.user>username</flyway.user>
        <flyway.password>password</flyway.password>
        <flyway.url>jdbc:mysql://localhost:3306/database</flyway.url>
        ...
    </properties>
We will focus on the yaml profiles, as it’s the most convenient in a Spring project. By default, flyway is enabled, uses spring’s primary datasource, and the scripts location is set to classpath:db/migration. This means we only have to configure spring’s datasource in our profile.
  datasource:
    driver-class-name: com.mysql.jdbc.Driver
    url: ${MYSQL_URL}
    username: ${MYSQL_USERNAME}
    password: ${MYSQL_PASSWORD}
Adding Flyway to a Spring project
Apart from configurations, for flyway to work in a Spring project we need to add a dependency:
 <dependency>
        <groupId>org.flywaydb</groupId>
        <artifactId>flyway-core</artifactId>
    </dependency>
And possibly a specific database type configuration, depending on what we use, for example:
    <dependency>
        <groupId>org.flywaydb</groupId>
        <artifactId>flyway-mysql</artifactId>
    </dependency>
If we have our datasource configured, it should be enough for flyway to work and automatically migrate the database on an application startup:
2023-07-10T15:00:41.705+02:00  INFO 15705 --- [           main] o.f.core.internal.command.DbValidate     : Successfully validated 4 migrations (execution time 00:00.013s)
2023-07-10T15:00:41.719+02:00  INFO 15705 --- [           main] o.f.c.i.s.JdbcTableSchemaHistory         : Creating Schema History table `jblog_common`.`flyway_schema_history` ...
2023-07-10T15:00:41.883+02:00  INFO 15705 --- [           main] o.f.core.internal.command.DbMigrate      : Current version of schema `jblog_common`: << Empty Schema >>
2023-07-10T15:00:41.888+02:00  INFO 15705 --- [           main] o.f.core.internal.command.DbMigrate      : Migrating schema `jblog_common` to version "1.0.1 - create user table"
2023-07-10T15:00:42.007+02:00  WARN 15705 --- [           main] o.f.c.i.s.DefaultSqlScriptExecutor       : DB: Integer display width is deprecated and will be removed in a future release. (SQL State: HY000 - Error Code: 1681)
2023-07-10T15:00:42.078+02:00  INFO 15705 --- [           main] o.f.core.internal.command.DbMigrate      : Migrating schema `jblog_common` to version "1.0.2 - create task table"
2023-07-10T15:00:42.182+02:00  WARN 15705 --- [           main] o.f.c.i.s.DefaultSqlScriptExecutor       : DB: Integer display width is deprecated and will be removed in a future release. (SQL State: HY000 - Error Code: 1681)
2023-07-10T15:00:42.237+02:00  INFO 15705 --- [           main] o.f.core.internal.command.DbMigrate      : Migrating schema `jblog_common` with repeatable migration "add java task"
2023-07-10T15:00:42.306+02:00  INFO 15705 --- [           main] o.f.core.internal.command.DbMigrate      : Migrating schema `jblog_common` with repeatable migration "fill task table"
2023-07-10T15:00:42.360+02:00  INFO 15705 --- [           main] o.f.core.internal.command.DbMigrate      : Successfully applied 4 migrations to schema `jblog_common`, now at version v1.0.2 (execution time 00:00.481s)
Java based migrations
It’s possible to register java JDBC migrations with flyway. All we need to do is follow the naming convention for the class, extend org.flywaydb.core.api.migration.BaseJavaMigration and put in the correct location (db/migration by default).
package db.migration;

import org.flywaydb.core.api.migration.BaseJavaMigration;
import org.flywaydb.core.api.migration.Context;

import java.sql.Statement;

public class R__add_java_task extends BaseJavaMigration {

    @Override
    public void migrate(Context context) throws Exception {
        try (Statement statement = context.getConnection().createStatement()) {
            statement.execute("INSERT INTO task(name, description) " +
                    "VALUES ('Java-migrated task name', 'Java-migrated task desc');");
        }
    }
}
As we can see, the migration shows up in the flyway info result.
Using the Flyway bean
Although it’s usually not necessary, it’s also possible to access and operate on the flyway bean from the Spring context:
private final Flyway flyway;
public void flyway() {
        MigrationInfoService infoService = flyway.info();
    }
Conclusion
Flyway is a versatile yet simple migration tool that works very well with Spring boot projects. It gives us a lot of power and control over our database management. What’s more, as we’ve seen, configuring it is very easy – so why not give it a try?
References
Looking for IT Project Outsourcing? Check out our services!
Meet the geek-tastic people, and allow us to amaze you with what it's like to work with j‑labs!
Contact us


