Python simple application Raspberry Pi
The Raspberry PI is a small computer that has a lot of possibilities. By combining the functions of a standard computer and a microcontroller, it allows you to easily and quickly create various types of projects. Thanks to the use of the operating system, it is possible to control our Raspberry PI using almost all available programming languages, including Python. In this article, I will present a simple project that will allow you to control our Raspberry PI using a REST API application created in the Python Flask framework.
Predictions for the project
In this article, I will demonstrate how we can use the Raspberry PI to run a simple Python application with the Flask library. The application will control Christmas lights. We will be able to remotely turn on and off our lights.
Connect to your Raspberry PI
I’m running a Raspberry PI A+ with an HDMI port. So the first step that I took was to install Raspbian (https://www.raspberrypi.com/software/operating-systems/) on my device. It is a Debian-based system. All beginning steps required external devices (keyboard and monitor). During our implementation, we don’t need those devices to control our raspberry. We will configure the remote controllability of our device. The best way to do this is to enable SSH on our device. Then we no longer require any external devices for our raspberry after this operation.
Enable SSH on GUI:
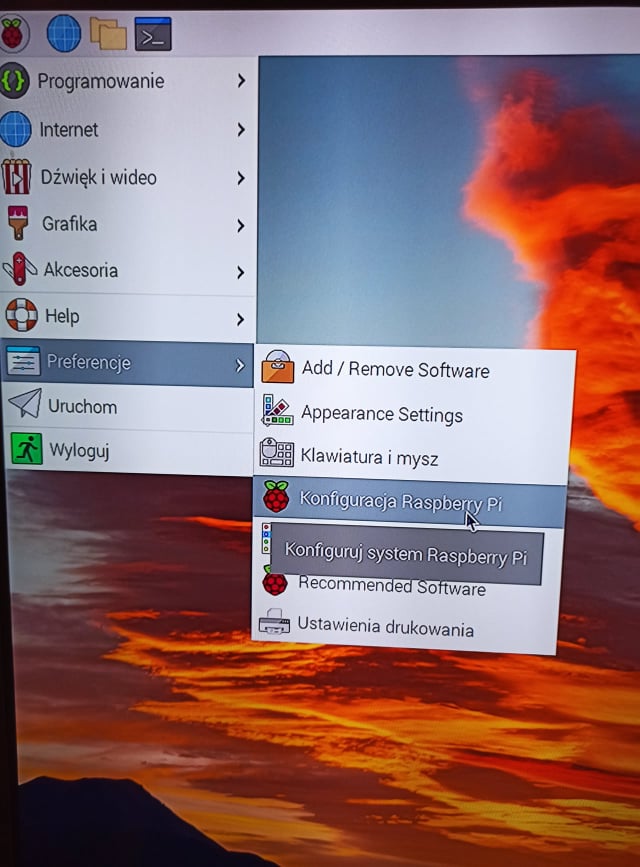
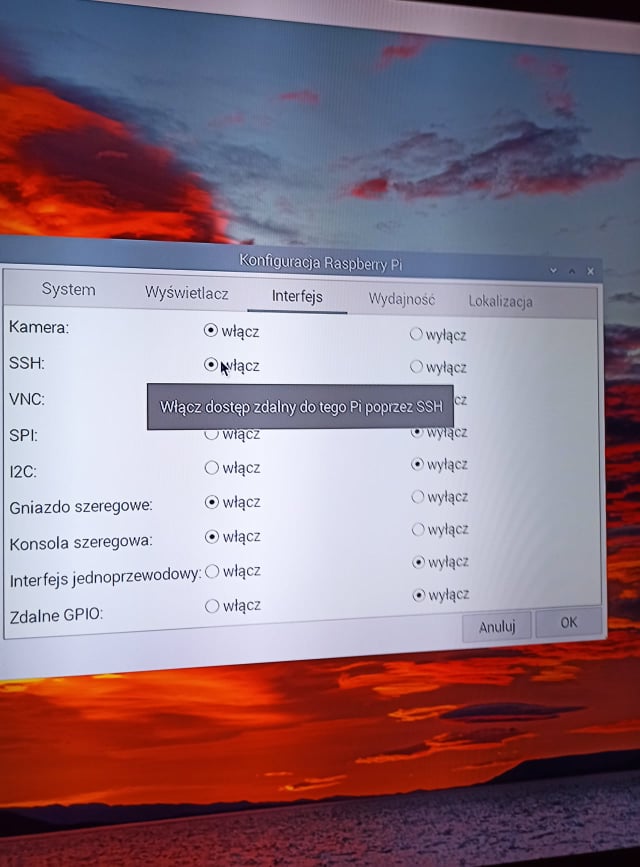
Connect the Raspberry PI to the internet if you don’t have a wifi module
Because my version of Raspberry PI doesn’t have wifi, I will use a USB threat to connect my Raspberry PI to the computer. To do this, we must connect our Android device via USB to the Raspberry Pi and enable USB threating.
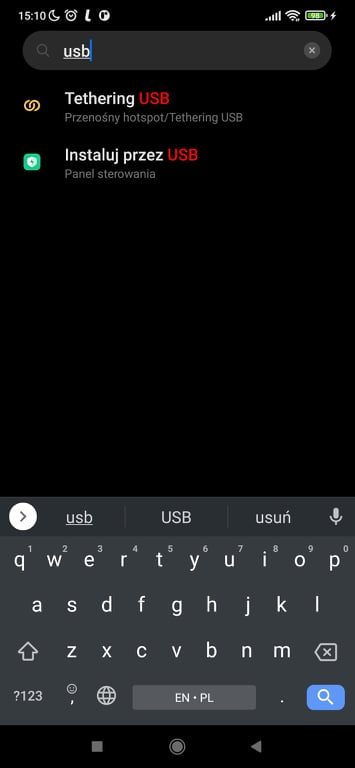
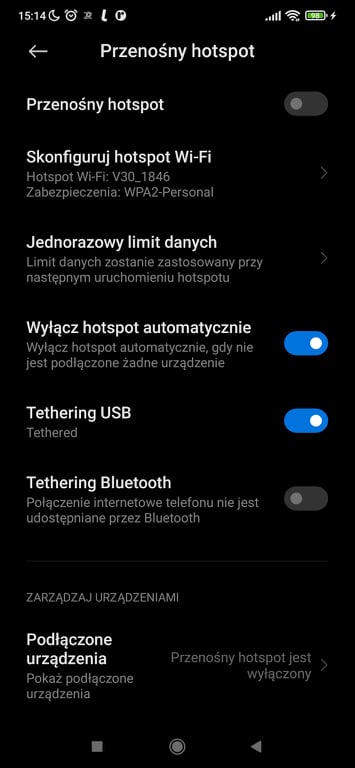
When we connect our Android device to the internet via wifi or an external network, we will see a network appears on our Raspberry PI. If we connect in this way to the internet, we now have a Raspberry PI connected to our android device network and we can only connect to the Raspberry PI from our device. To connect the Raspberry PI to our computer, we need to connect by ssh first to our device and then to the Raspberry PI. Let’s see how we can do this step-by-step:
- Install the app on your Android device.
SSHelper(https://play.google.com/store/apps/details?id=com.arachnoid.sshelper&hl=pl&gl=US) (SSH server). Thanks to that, we can connect to our Android device from a computer. Of course, we need to be on the same network.
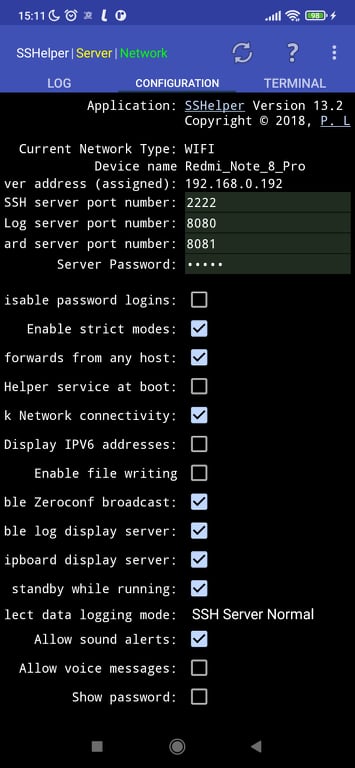
- Find the Raspberry PI IP address by
Ping & Netapplication (https://play.google.com/store/apps/details?id=com.ulfdittmer.android.ping&hl=pl&gl=US). In my case, you can see it here:
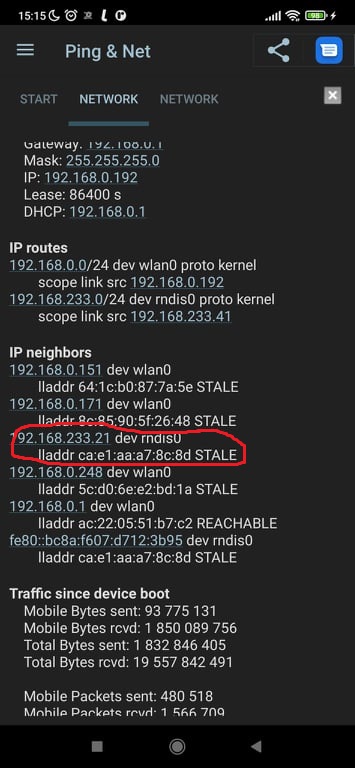
First we need to connect to the Android device via SSH:
On terminal:
ssh pi@192.168.0.192 -p 2222SSHeper's default user and password are admin. And after that, we can connect to the Raspberry PI (when we are already logged into the android device).
ssh pi@192.168.233.21 -p 2222In my case, I don’t change the user and password, so my user is default pi and password raspberry.
Connect the Raspberry PI to the internet if you have a wifi module
If you have the Raspberry PI version with wifi, you can connect directly to your device. All that you have to do is find the IP address of your Raspberry PI. We can use this simple application (https://angryip.org/) to show all devices connected to our network:
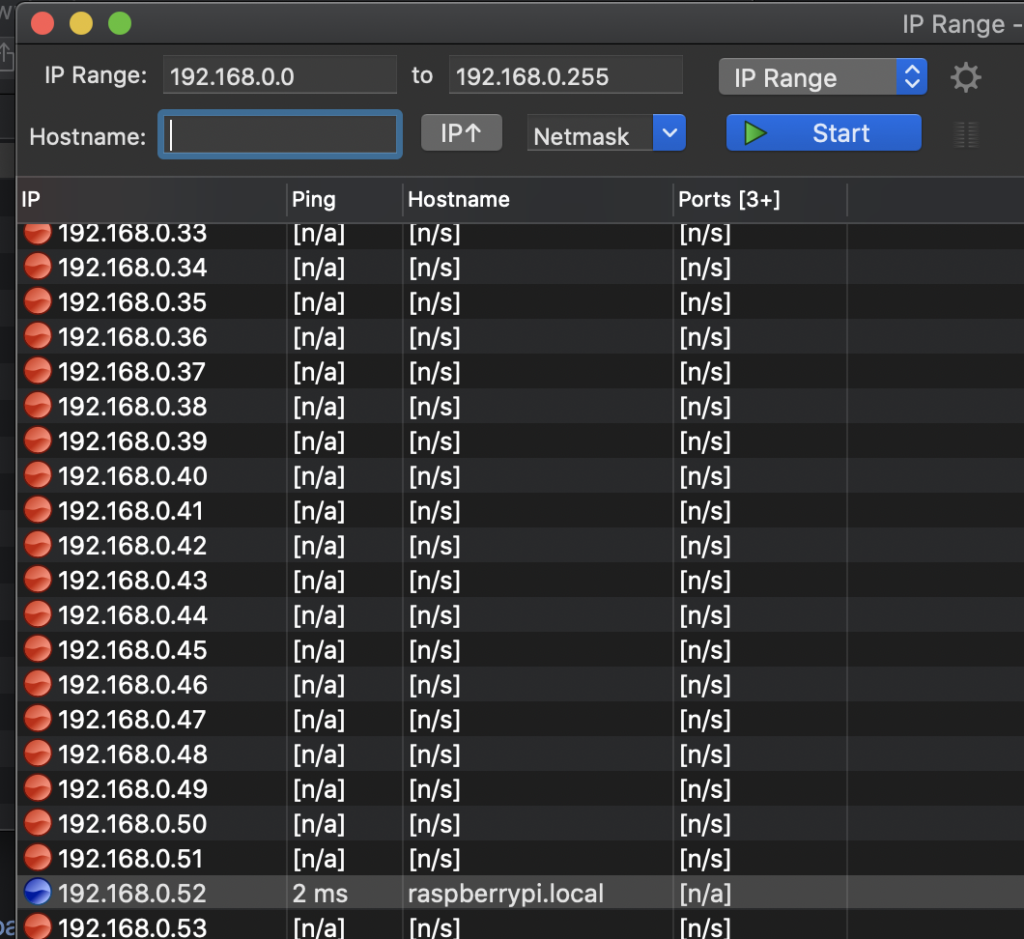
Now, when we know that our Raspberry PI has an address of 192.168.0.52, we can easily connect by ssh. Use standard terminal for Mac and Linux; for Windows, download the well-known application putty: https://www.putty.org/.
Now all we have to do is connect to the Raspberry PI (in my case, I don’t change the user and password, so my user is default pi and password raspberry). Everything depends on what you set during the installation of Rasbian.
On terminal:
ssh pi@192.168.0.52A simple Python Flask application to control Christmas lights
Our simple app will have two endpoints to turn the lights on and off. Each endpoint will call logic to communicate with the Raspberry PI through the Python and Flask libraries. The whole project is enabled here: https://github.com/michaltomasznowak/python_raspberrypi All we need on our Raspberry PIÂ to run applications is Python and the Flask library. By default, the Raspberry PI should have already installed Python. But if you don’t have, then run the command:
sudo apt update
sudo apt install python3
Install the Flask library:
sudo apt update
sudo apt install flask
Install the application on our Raspberry PI.
To copy our project to the Raspberry PI, we will use git. Our approach is to work on a computer, commit and push our changes to the repository, and then pull those changes onto the raspberry and run the application. First, we must install Git on our Raspberry PI:
sudo apt update
sudo apt install git
Now we can copy our project to the Raspberry PI with the following command:
git clone https://github.com/michaltomasznowak/python_raspberrypi.gitNow in the downloaded project, we can easily run our project by:
python controller.pyEndpoints
Our application will support two endpoints: Â with raspberry:
- enable light (on)
- disable light (off)
from flask import Flask

from raspberry_service import RaspberryService

app = Flask(__name__)

raspberry_service = RaspberryService()


@app.route('/api/v1/raspberry/on', methods=['GET'])
def on():
    return "On Pin: " + str(raspberry_service.on)


@app.route('/api/v1/raspberry/off', methods=['GET'])
def off():
    return "Off Pin: " + str(raspberry_service.off)


app.run(host='0.0.0.0')
In this part of the code, the situation is clear. We created two simple endpoints using the Flask library. And we execute our application with the command app.run (host='0.0.0.0') In this part of the code, we use object raspberry_service to implement RaspberryService class where we have configured our connection to the Raspberry PI pins. Let’s see this class:
import RPi.GPIO as GPIO


class RaspberryService:

    def __init__(self):
        GPIO.setmode(GPIO.BOARD)
        self.relay_pin = 8
        GPIO.setup(self.relay_pin, GPIO.OUT)

    @property
    def on(self):
        GPIO.output(self.relay_pin, GPIO.HIGH)
        return self.relay_pin

    @property
    def off(self):
        GPIO.output(self.relay_pin, GPIO.LOW)
        return self.relay_pin
Let’s focus for a while on this code. At the start, we have the init section:
def __init__(self):
        GPIO.setmode(GPIO.BOARD)
        self.relay_pin = 8
        GPIO.setup(self.relay_pin, GPIO.OUT)
On the first line: GPIO.setmode(GPIO.BOARD) we said on with the method of numeratian pins we want to use. We have board numeration (numbers in ()) and BTW numeration (green numbers with GPIO_) We can see all these pins with numbers by calling on our Raspberry PI command:
pinoutThen we will see our board with pins:

In the next code lines:
self.relay_pin = 8
        GPIO.setup(self.relay_pin, GPIO.OUT)
We specify which port will be used as an out port (GPIO.OUT refers to the port used to send messages from the Raspberry Pi). Another option is IN port on which we can listen. In this article, we only focused on the OUT port. In the next lines, we will implement two methods to set the HIGH status on our pin (turn on light) and the LOW status on our pin (turn off light). Those methods are called rest endpoints. In those methods, we return the used pin.
External device connections to the Raspberry Pi
Now let’s see how everything is connected. Here we have a real picture:
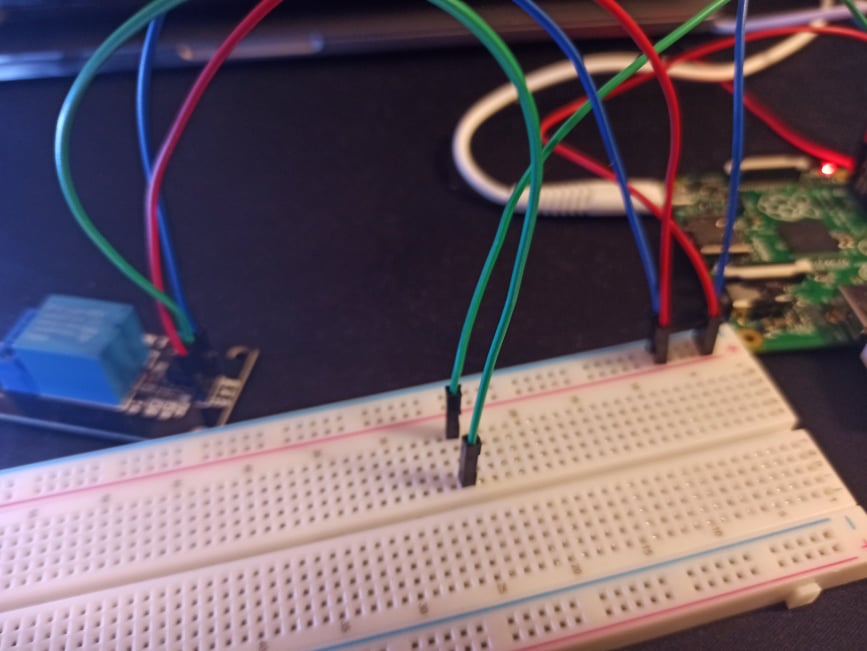
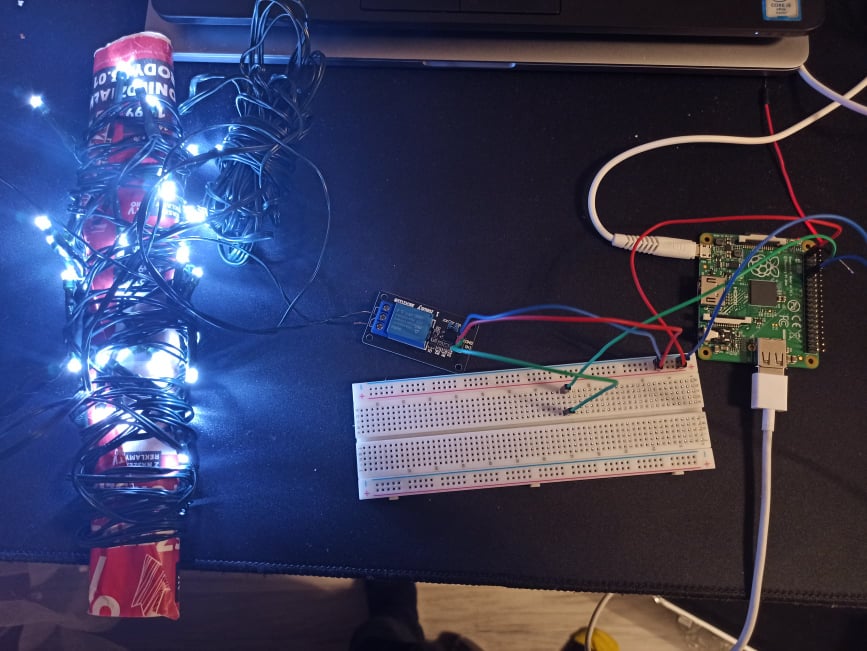
As you can see, it is not so clear how to find connections. Because of that, to show a Raspberry PI connection, we can use the Fritzing (https://fritzing.org/) application.
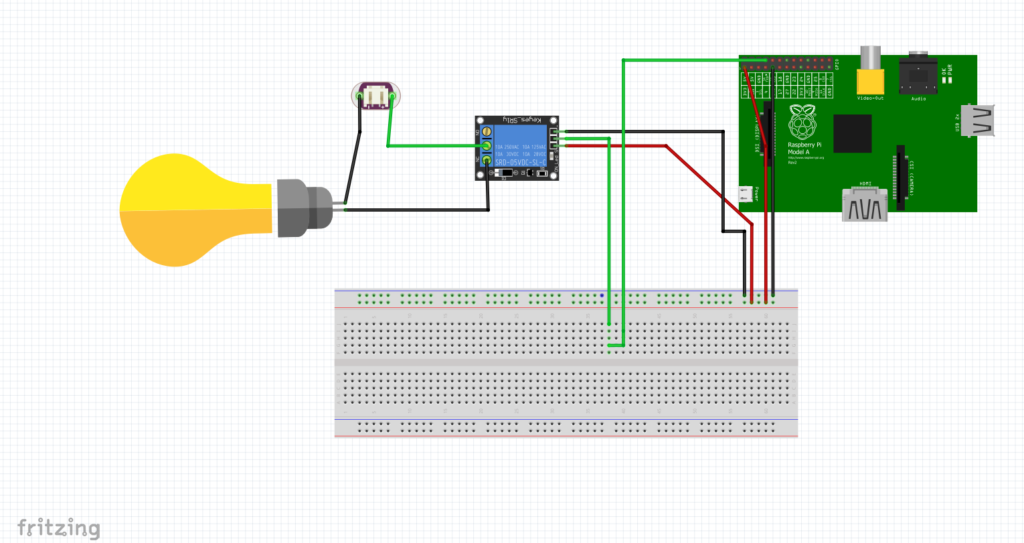
The whole project is enabled in the repository:
https://github.com/michaltomasznowak/python_raspberrypi/tree/main/fritzing
Now let’s see how everything works. I uploaded a movie to YouTube that shows the result of this project:
https://www.youtube.com/watch?v=rWy_xqZgmoM
To call our applications, we used endpoints:
- http://[your raspberry pi ip]:5000/api/v1/raspberry/on
- http://[your raspberry pi ip]:5000/api/v1/raspberry/off
Remember, in my case, I called from an Android device because it has the same network as the Raspberry PI. An easy solution is to have a raspberry with wifi or use the wifi usb adapter. Â
Summary
The Raspberry PI is a great controller that can provide you with the tools to create great projects with less knowledge of complicated microcontroller architecture. If you know the Python language, it is really easy to create many interesting projects. This article shows only the basic use of the Raspberry PI. But with not a lot of complicated work, we can really quickly see the effects of our work, which is really satisfying. Based on this project, you can control any electric device in your home by using your phone.
References
Poznaj mageek of j‑labs i daj się zadziwić, jak może wyglądać praca z j‑People!
Skontaktuj się z nami


