'%3E%3Cpath fill='%233A5C8D' d='M18.08 2H1.93C.87 2 0 2.85 0 3.9v15.5l.22.02c9.75 0 17.7-7.8 17.86-17.42Z' /%3E%3Cpath fill='%233A5C8D' d='M26.33 2H24.2C24.05 14.97 13.35 25.48.22 25.48L0 25.47v2.61C0 29.14.87 30 1.93 30h24.4c1.06 0 1.94-.86 1.94-1.92V3.91c0-1.05-.88-1.9-1.94-1.9Z' /%3E%3Cpath fill='%23262C49' d='M39.27 31.8c-.74-.2-1.28-.74-1.28-1.48 0-.88.67-1.55 1.56-1.55.23 0 .37.03.64.03 1.7 0 2.92-.63 2.92-3.02V10.52c0-1.04.74-1.81 1.8-1.81 1.01 0 1.76.77 1.76 1.81v15.73c0 3.9-2.34 5.75-5.83 5.75a5.1 5.1 0 0 1-1.57-.2Zm8.01-28.87a2.34 2.34 0 0 1-2.37 2.28 2.32 2.32 0 0 1-2.38-2.28 2.31 2.31 0 0 1 2.38-2.3 2.35 2.35 0 0 1 2.37 2.3Zm9.26 14.31a2.62 2.62 0 0 1-2.66 2.57 2.6 2.6 0 0 1-2.67-2.57 2.6 2.6 0 0 1 2.67-2.56 2.63 2.63 0 0 1 2.66 2.56Zm4.56 6.89V1.81C61.1.77 61.84 0 62.9 0c1.01 0 1.76.77 1.76 1.81v22.32c0 1.05-.75 1.82-1.76 1.82-1.02 0-1.8-.77-1.8-1.82Zm21.93-8.53v8.57a1.7 1.7 0 0 1-1.76 1.78 1.73 1.73 0 0 1-1.76-1.78v-.2a6.88 6.88 0 0 1-5.13 1.98c-3.46 0-5.8-1.92-5.8-4.77 0-2.9 2.37-4.7 6.14-4.7h4.72v-1.09c0-2.25-1.3-3.52-3.57-3.52-1.39 0-2.64.5-3.69 1.54-.44.37-.82.54-1.23.54-.84 0-1.55-.7-1.55-1.48 0-.5.23-.97.7-1.44a8.39 8.39 0 0 1 6.08-2.32c4.31 0 6.85 2.55 6.85 6.89Zm-3.6 3.73v-.3h-4.27c-1.93 0-2.95.7-2.95 2.01 0 1.35 1.15 2.19 2.92 2.19 2.4 0 4.3-1.72 4.3-3.9Zm25.67-1.99c0 4.98-3.46 8.61-8.14 8.61-2.38 0-4.38-.9-5.64-2.42v.6c0 1.08-.74 1.82-1.72 1.82-1.06 0-1.8-.77-1.8-1.82V1.81C87.8.77 88.58 0 89.6 0c1.01 0 1.76.74 1.76 1.81v9.32a7.07 7.07 0 0 1 5.56-2.42c4.72 0 8.18 3.66 8.18 8.63Zm-3.66-.03c0-3.09-2.14-5.38-5.1-5.38-3.01 0-5.02 2.19-5.02 5.41 0 3.2 2.04 5.38 5.03 5.38 2.95 0 5.09-2.28 5.09-5.4Zm6.66 6.09c-.34-.3-.51-.67-.51-1.15 0-.84.71-1.54 1.6-1.54.37 0 .74.13 1.11.47a5.66 5.66 0 0 0 3.9 1.71c1.46 0 2.68-.6 2.68-1.85 0-1.07-.98-1.5-2.34-2.05l-1.7-.7c-2.67-1.11-4.34-2.32-4.34-4.81 0-3.06 2.58-4.77 5.88-4.77 2.13 0 4 .77 5.29 2.01.37.34.54.74.54 1.18a1.5 1.5 0 0 1-1.5 1.51c-.37 0-.67-.16-1.11-.5a5.47 5.47 0 0 0-3.3-1.14c-1.32 0-2.27.5-2.27 1.58 0 .9.68 1.34 2.2 1.95l1.6.63c3.02 1.25 4.55 2.56 4.55 4.98 0 3.32-2.85 5.04-6.17 5.04a8.25 8.25 0 0 1-6.11-2.56Z' /%3E%3C/g%3E%3Cdefs%3E%3CclipPath id='a'%3E%3Cpath fill='%23fff' d='M0 0h120.38v32H0z' /%3E%3C/clipPath%3E%3C/defs%3E%3C/svg%3E)
Avoiding massive ViewControllers in iOS applications with VIP architecture

The whole VIP cycle: it really works and allow to omit massive ViewControllers problem. This article is a description of that idea.
What is massive ViewController?
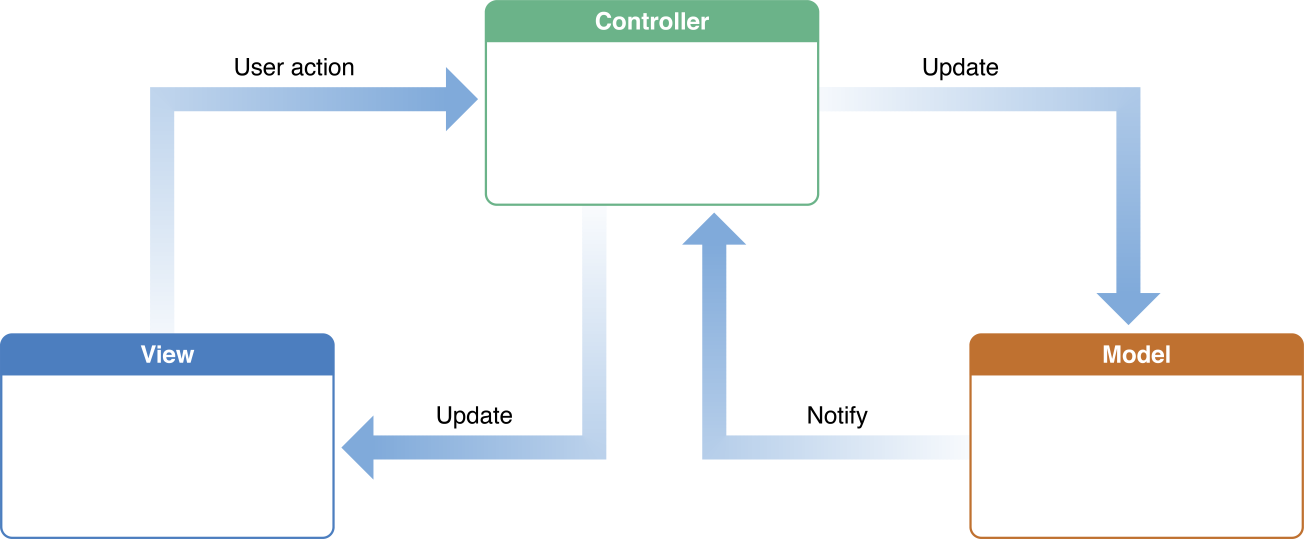
Preferable iOS application’s architecture is MVC (Model-View-Controller).
MODEL: it encapsulates the application data and resources. Model objects represent business and application logic structure. They should have one-to-one or one-to-many relation with other model objects. The data represents general problem, so it should be reusable to other applications. Perfect implementation should be independent from any view and shouldn’t be based on user-interface.
VIEW: it is part of application visible and interactive to user. View objects know how to draw itself, how to scale up and down and how to react to users actions. Their main goal is to display application data and allow user to modify it in an accessible way.
CONTROLLER: it is some kind of medium between model and view. As you can see on below diagram, model and view do not know about each other. It is controller responsible for exchanging data between them. Controllers are typically assigned to specific view object and have access to necessary part of model objects.

Apple’s standard implementation of MVC pattern is as follows:
- View is placed on Storyboard (board with all the views of iOS application and relationships, connections between them);
- Controller is assigned to specific View, called ViewNameViewController (where ViewName is name of view it is assigned to);
- Model objects contain application data, as in definition.
After this basic description of typical iOS application, you would probably want to get the answer to mid-title question – what is massive ViewController?
Let us assume simple situation: we have a input text field in our iOS application. We just create outlet to it in our ViewController and it is ready to give it functionality. Ok, so we define what happens when user put some data into it. Hm… Should it get only numeric values? No problem, let us add method for validation the data. But why not define keyboard that should display when user taps the text field? Yes, that is great, we define specific type of keyboard, with numeric values only.Ok, but keyboard does not disappear… we have to implement functionality for keyboard to disappear, when user taps out of text field. Ok, we have it!
Simple text field, with „just” five functional methods to have it already working. Now we want to add UIPickerView to our application. We have to implement UIPickerViewDelegate and UIPickerViewDataSource methods to our ViewController. At least four main methods, but we have to implement also some data it should get. New methods again, new functionality and we are still in the same ViewController class, which is responsible for keyboard management, user input data, data formatting, validations and we are still at the beginning of the road – we may need to, for example, add connection to other ViewController.
That is how Massive ViewControllers begin their existence. They are growing bigger and bigger, overfilled with functionality and responsibilities, difficult to maintain, extend and test.
VIP architecture as a solution
I had the same problem as many people around with massive ViewControllers. After the time, working with them becomes a nightmare, this is the same feeling as when you have an old code to maintain. But this is not an ancient code, this is the one you have been developing for a month. I was trying to find the solution for this problem and then I found VIP architecture, created by Raymond Law. This article describes only basic assumptions and rules of VIP, for more, please look at http://clean-swift.com. It is a website, where you can get very extensive information about this architecture and get prepared setup, which you can use in your application.

What is VIP?
V stands for ViewController, I is for Interactor and P is Presenter. This is closed circle process, as it is depicted on the diagram.
For better understanding this concept, I created empty SingleView iOS application and add a Scene for it. Scene is base for VIP architecture development. Its name should describe briefly what it does. For example, if you want to create scene that contains calculation of something, just call the scene CalculateResult. If you want your scene to be responsible for presenting data in a list, call its ListData. It is very simple and makes finding needed information easy. Each scene contains files for Configurator, Interactor, Models, Presenter, Router, ViewController and Worker. It may sound little strange: we base on ViewController, Interactor and Presenter, but have seven separate files? Well, that is great in fact, because it isolates responsibilities. In fact, Configurator and Router are not functional classes. Configurator is responsible for all the connections between classes etc. Router, as the name suggests, contains segue to other scene and allows user to switch between views.
Coming back to other classes, we have ViewController, Interactor, Presenter, Models and Worker that are directly involved in development process. I called my project TestApp and scene Test (which does not follow the convention of naming the scene I mentioned about, but is just for describing the architecture, so please forgive me), so all classes will have prefix Test. Let us start, where it always begins – in View Controller.
TestViewController.swift file
protocol TestViewControllerInput
{
  func displaySomething(viewModel: Test.Something.ViewModel)
}

protocol TestViewControllerOutput
{
  func doSomething(request: Test.Something.Request)
}

Those are two protocols that we can observe on diagram as ViewControllerInput and ViewControllerOutput.
class TestViewController: UIViewController, TestViewControllerInput
{
  var output: TestViewControllerOutput!
  var router: TestRouter!

…
  // MARK: - View lifecycle

  override func viewDidLoad()
  {
    super.viewDidLoad()
    doSomethingOnLoad()
  }

  // MARK: - Event handling

  func doSomethingOnLoad()
  {
    // NOTE: Ask the Interactor to do some work

    let request = Test.Something.Request()
    output.doSomething(request: request)
  }

  // MARK: - Display logic

  func displaySomething(viewModel: Test.Something.ViewModel)
  {
    // NOTE: Display the result from the Presenter

    // nameTextField.text = viewModel.name
  }
}
As it can be observed, ViewController implements input protocol methods (in this case it is one method, displaySomething(viewModel: Test.Something.ViewModel)). This method finishes the VIP cycle – it displays data received from Presenter. There is also method doSomethingOnLoad(), which is called when view is loaded. In this method we have output, which is of output protocol type and it starts the VIP cycle.
TestModels.swift file
Now we look into the file that is not exactly in the VIP cycle, but without it the process would fail. You may noticed that ViewControllers gets Test.Something.ViewModel structure and sends Test.Something.Request as a parameter in output method. They are taken from TestModels file.
struct Test
{
  struct Something
  {
    struct Request
    {
    }
    struct Response
    {
    }
    struct ViewModel
    {
    }
  }
}
At the moment, these are only empty nested structures, but this is the place, where you can define what exactly you would like to get. You specify what you ask for (Request), what you want to get (Response) and what you want to display at the end (ViewModel). Those structures interact in the whole process in many places, but you define them in one place, what is great.
TestInteractor.swift file
protocol TestInteractorInput
{
  func doSomething(request: Test.Something.Request)
}

protocol TestInteractorOutput
{
  func presentSomething(response: Test.Something.Response)
}
As in ViewController, we have an input and an output here. Input is the output of the ViewController, what corresponds to the flow diagram and is implemented by Interactor class.
class TestInteractor: TestInteractorInput
{
  var output: TestInteractorOutput!
  var worker: TestWorker!

  // MARK: - Business logic

  func doSomething(request: Test.Something.Request)
  {
    // NOTE: Create some Worker to do the work

    worker = TestWorker()
    worker.doSomeWork()

    // NOTE: Pass the result to the Presenter

    let response = Test.Something.Response()
    output.presentSomething(response: response)
  }
}
We can observe that doSomething(request: Test.Something.Request) method is the one that is called in ViewController. It sends the Response as the parameter of output method presentSomething(response: response).
TestWorker.swift file
You may observe that doSomething(request: Test.Something.Request) has Worker object inside of it. In empty application it is of course unnecessary, let us think about very simple situation, but requiring worker. We have two text fields that takes two numbers and at the end we want to display sum of them in a label. We send two Double objects in Request and in Response we would like to send the result – one Double. Result should not be calculated in the Interactor, so we need provide worker for it. Worker provides a method summing those two numbers up and returning the result. Existence of worker is highly important in such case. To be fair, look into the empty Worker class, just to make friends with it.
class TestWorker
{
  // MARK: - Business Logic

  func doSomeWork()
  {
    // NOTE: Do the work
  }
}
TestPresenter.swift file
Finally, we get here! This the last thing in our VIP process – the presenter. Its responsibility is to get the Response, format it and send to the ViewController. Formatting does not only mean changing the font, its color or size (it is very important though). It means also we need to send the data to be displayed in correct format. Mostly the displayed format is String, but Response can contain multiple different types and we need to provide correct formatting them into String.
protocol TestPresenterInput
{
  func presentSomething(response: Test.Something.Response)
}

protocol TestPresenterOutput: class
{
  func displaySomething(viewModel: Test.Something.ViewModel)
}
We have standard input and output protocols here. Input is Interactor’s output and is called in doSomething(request: Test.Something.Request) method. Output is also known to us, as it is ViewController’s input and closes the VIP circle.
class TestPresenter: TestPresenterInput
{
  weak var output: TestPresenterOutput!

  // MARK: - Presentation logic

  func presentSomething(response: Test.Something.Response)
  {
    // NOTE: Format the response from the Interactor and pass the result back to the View Controller

    let viewModel = Test.Something.ViewModel()
    output.displaySomething(viewModel: viewModel)
  }
}
This is very simple implementation – Presenter sends the same data as it received. Typically we would need to provide some formatting here.
It is done!
It took a while, but we are finally here, after whole VIP cycle. It really works and allow to omit massive ViewControllers problem. You may still not see quite clearly, but it is best when tried on own applications. This article is just a description of an idea. If you want to learn more of VIP architecture, you may visit http://clean-swift.com. You will not regret!
You may find project I used in this article on my GitHub: https://github.com/kubaht/EmptyVIPproject/tree/master/TestApp.
Poznaj mageek of j‑labs i daj się zadziwić, jak może wyglądać praca z j‑People!
Skontaktuj się z nami


