Spring Boot Actuator
One of the Spring Boot project is Spring Boot Actuator. This starter brings you production-ready features to help you monitor, gathering metrics, understanding traffic or the state of database and manage your application.
It exposes operational information about the running application by HTTP endpoints or JMX beans. And the best part is – only thing you need to do is to include it in your dependencies!
Let’s start!
To enable Spring Boot Actuator you will just need to add the proper dependency to your pom.xml (assuming that you are using Maven):
<dependency>
    <groupid>org.springframework.boot</groupid>
    <artifactid>spring-boot-starter-actuator</artifactid>
</dependency>
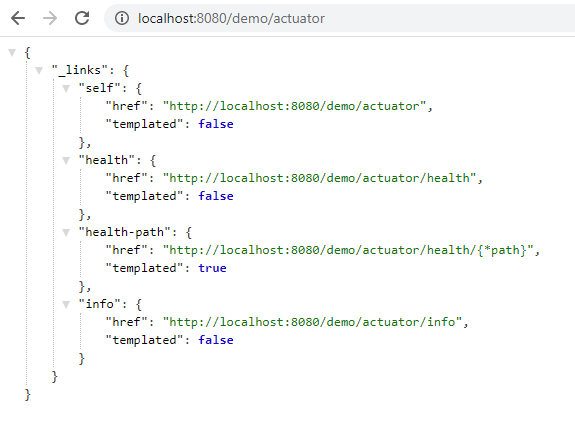
After that you will get access to new endpoint in your application – /actuator, with list of links with another basic endpoints:

Note that if you previously configured property spring.mvc.servlet.path your actuator’s endpoint will also be using provided path. Also for better data presence you can use property:
spring.jackson.serialization.indent_output=trueYou can also use JSON plugin for formatting in your browser. On this screenshot we used Google Chrome with JSON Formatter installed.
To move between endpoint you can simply type new address in browser or if you are using formatting plugin just click on link. Both available endpoints provide us very basic data, /actuator/health returns:
{
  "status": "UP"
}
and /actuator/info returns empty object:
{}You can simply enhance that endpoints. For example to add more data to /info endpoint you can type in properties:
info.app.name=Spring Boot Demo
info.app.version=1.0.0-SNAPSHOT
and actuator/info will return:
{
  "app": {
    "name": "Spring Boot Demo",
    "version": "1.0.0-SNAPSHOT"
  }
}
You can also use environment variables, like:
info.java-home=${java.home}
info.java-version=${java.version}
will result with:
{
  "app": {
    "name": "Spring Boot Demo",
    "version": "1.0.0-SNAPSHOT"
  },
  "java": {
    "home": "D:\\work\\jdk-13.0.1",
    "version": "13.0.1"
  }
}
Gotta catch’em all!
By default (almost) all of the endpoints are enabled, but only two of them – /health and /info – are exposed by web, other can be accessed by JMX. To change that you will need to use management.endpoints.web.exposure.include property and specify endpoints name. You can also use wildcard to expose them all:
management.endpoints.web.exposure.include=*After that, when you will go to /actuator you will see full list of them:

All this endpoints can be also used to manage application by Spring Boot Admin – web application from outside the Spring project, used for managing and monitoring Spring Boot applications. More information can be obtain here.
There is one more endpoint to do some bad things – /shutdown. It’s disabled by default. To turn it on use:
management.endpoint.shutdown.enabled=trueand… yes, you can send POST request and close your application:
curl -X POST http://localhost:8080/demo/actuator/shutdown
As a result of this request you will see:
{
  "message" : "Shutting down, bye..."
}
Custom endpoint
To create custom endpoint compatible with Spring Boot Actuator you need to write a class with @Endpoint annotation and with at least one of the method annotated by @ReadOperation, @WriteOperation, or @DeleteOperation. Methods marked in that way will be mapped to, respectively: GET, POST and DELETE HTTP methods.
Let’s add simple endpoint to saving/reading properties in/from memory. Our class should looks like:
import org.springframework.boot.actuate.endpoint.annotation.*;
import org.springframework.stereotype.Component;

import java.util.Map;
import java.util.concurrent.ConcurrentHashMap;

@Component
@Endpoint(id = "properties")
public class PropertiesEndpoint {

    private Map<string, string=""> properties = new ConcurrentHashMap<>();

    @ReadOperation
    public Map<string, string=""> properties() {
        return properties;
    }

    @WriteOperation
    public void setProperty(@Selector String key, String value) {
        properties.put(key, value);
    }

    @DeleteOperation
    public void deleteProperty(@Selector String key) {
        properties.remove(key);
    }

}
After that you can send POST request to set new property:
curl --header "Content-Type: application/json" --request POST --data "null" http://localhost:8080/demo/actuator/properties/name?value=Actuator%20Demo
and GET to see the updated list:
curl -X GET http://localhost:8080/demo/actuator/properties
{
"name" : "Actuator Demo"
}
You don’t need to create brand new endpoints, you can also extend existing ones. To do that simply change @Endpoint to, for example:
@EndpointWebExtension(endpoint = InfoEndpoint.class)Other cool features
Beside endpoints Spring Boot Actuator offers us some other things. One of them is the ability to view and configure the log levels of your application at runtime. It also provides dependencies and auto-configuration for Micrometer, a metrics facade that supports numerous monitoring systems, like Atlas, Dynatrace, Elastic or Graphite.
We have also tools for HTTP tracing, with the last 100 request-response exchanges stored by default and for processes monitoring. Last but not least: it offers us Cloud Foundry Support when you deploy your application to a compatible Cloud Foundry instance. The /cloudfoundryapplication path will provide an alternative route to all @Endpoint’s.
Conclusion
Every person who decided to use Spring Boot should also get to know Actuator. Those features should be auto-included in their projects, even if will be used only for development purposes. But if you want, there are no obstacles to bring the magic to the production!
Links
Spring Boot Reference Documentation
JSON Formatter plugin for Google Chrome
Poznaj mageek of j‑labs i daj się zadziwić, jak może wyglądać praca z j‑People!
Skontaktuj się z nami


