Spring Boot and Angular 2 #1
In this article I would like to show you how to create simple application with Spring Boot on server side and Angular 2 at a front-end. In my opinion it is very good combination, proper for many types of projects. I assume that you have some basic knowledge about Java and Angular 2.
Requirements
- Java basic knowledge
- Angular basic knowledge
- Angular CLI and Gradle basics
- Spring basics not necessarily
Spring boot template
In order to start you should clone project from my gitHub repo: https://github.com/gitGrzegorz/skijumpers-template
It is very basic template spring boot configuration in gradle, but if you prefer to create it from scratch you can use one of spring boot tutorials. I will describe this template below so don’t worry if there is something that you don’t understand in project. Have you ever used gradle before? No? That’s OK, you don’t need anything more than dependencies management for this tutorial but if you want to know more about Gradle I recommend you this tutorial: https://spring.io/guides/gs/gradle/
In our template we have actually two files which I will describe below.
gradle.build
buildscript {
    repositories {
        mavenCentral()
    }
    dependencies {
        classpath("org.springframework.boot:spring-boot-gradle-plugin:1.4.3.RELEASE")
    }
}

apply plugin: 'java'
apply plugin: 'eclipse'
apply plugin: 'idea'
apply plugin: 'org.springframework.boot'

jar {
    baseName = 'skijumpers'
    version =  '0.1.0'
}

repositories {
    mavenCentral()
}

sourceCompatibility = 1.8
targetCompatibility = 1.8

dependencies {
    compile("org.springframework.boot:spring-boot-starter-web")
    testCompile('org.springframework.boot:spring-boot-starter-test')
    testCompile('com.jayway.jsonpath:json-path')
Three things worth of notice here, we obviously use Java 1.8, we imported a few spring boot starters and dependencies which I will describe below and we use Spring Boot Gradle plugin. What does this plugin do?
It provides dependency resolver that sets the version number to match Spring Boot dependencies. It builds one big jar which contains all dependencies from classpath. It also finds the “public static void main()” method and marks it as a runnable class.
Spring boot dependencies:
- spring-boot-starter-web – starter for building web, including RESTful, applications that use Spring MVC. Uses Tomcat as the default embedded container
- spring-boot-starter-data-jpa – starter for using Spring Data JPA with Hibernate
- com.h2database:h2 – it’s not spring dependency but we will use it as our in-memory database
I decided to use h2 database to avoid all additional configuration steps in our project. After we finished, you can change it for any database you want.
Second file Application.java:
package pl.jlabs.tutorial.skijumpers;

import org.springframework.boot.SpringApplication;
import org.springframework.boot.autoconfigure.SpringBootApplication;

@SpringBootApplication
public class Application {

    public static void main(String[] args) {
        SpringApplication.run(Application.class, args);
    }
}
Very simple class with “public static void main” method. In this method we use a static helper that run a SpringApplication from the specified source using default settings. Our class also has a @SpringBootApplication annotation that is a collection of few other spring annotations:
- @ComponentScan – lets Spring Boot scan this package for spring components, services, controllers etc.
- @EnableAutoConfiguration – tells Spring Boot to start adding beans based on classpath
- @Configuration – marks class as bean definition of application context
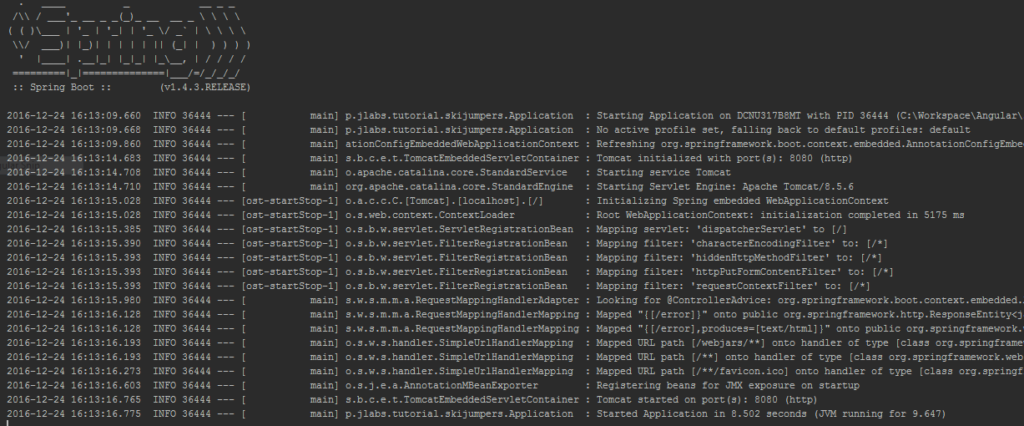
That’s all. We are ready to use it. You can start main class and you should see something like this:

The last line means that spring boot already started. As you probably noticed Spring boot started tomcat for us on port 8080. It is one of the reasons why I really like Spring Boot, it gives us very simple way to run application with almost no configuration files but it still allows us to setup everything on our own. So let’s start some coding.
Create rest services
In order to create services we should create some entity for our persistence layer first.
Create file ‘SkiJumper.java’:
package pl.jlabs.tutorial.skijumpers;

import javax.persistence.Entity;
import javax.persistence.GeneratedValue;
import javax.persistence.GenerationType;
import javax.persistence.Id;

@Entity
public class SkiJumper {
@Id
@GeneratedValue(strategy= GenerationType.AUTO)
private Long id;
private String name;
private String surname;
private String country;

public Long getId() {
return id;
}

public void setId(Long id) {
this.id = id;
}

public String getName() {
return name;
}

public void setName(String name) {
this.name = name;
}

public String getSurname() {
return surname;
}

public void setSurname(String surname) {
this.surname = surname;
}

public String getCountry() {
return country;
}

public void setCountry(String country) {
this.country = country;
}
}
It is simple POJO Java class with @Entity annotation from JPA, it has Long as Id column. Nothing special here, so let’s create CRUD (create/read/update/delete) operations for this entity.
Create file SkiJumperRepository.java
package pl.jlabs.tutorial.skijumpers;

import org.springframework.data.repository.CrudRepository;

import java.util.List;

public interface SkiJumperRepository extends CrudRepository<SkiJumper, Long> {

    List<SkiJumper> findByCountry(String country);
}
We just created a CRUD interface which has all methods that we need. Our interface extends CrudRepository interface, it has two generic parameters: SkiJumper as entity class and Long means ID. This is from Spring Boot Data and it gives us a lot of methods out of box like: save, findOne, findAll, count, delete, deleteAll. And we have an easy mechanism to implement our own methods, we just need to use proper naming convention and Spring will do it for us!
It is quite natural naming convention and I think this is awesome, because it reduces a lot of code. Right now we need another thing. It will be data base initialization, because at the start our base is empty L. Let’s fill it with some data when the application will be started. In order to do this we will use ApplicationRunner interface from Spring Boot.
Create file ‘DatabaseInitializer.java’:
package pl.jlabs.tutorial.skijumpers;

import org.slf4j.Logger;
import org.slf4j.LoggerFactory;
import org.springframework.beans.factory.annotation.Autowired;
import org.springframework.boot.ApplicationArguments;
import org.springframework.boot.ApplicationRunner;
import org.springframework.core.annotation.Order;
import org.springframework.stereotype.Component;

@Component
@Order(1)
public class DatabaseInitializer implements ApplicationRunner {

    private static final Logger logger = LoggerFactory.getLogger(DatabaseInitializer.class);

    @Autowired
    private SkiJumperRepository skiJumperRepository;

    @Override
    public void run(ApplicationArguments args) throws Exception {
        logger.info("DB initialization started...");
        skiJumperRepository.save(createSkiJumper("Kamil", "Stoch", "Poland"));
        skiJumperRepository.save(createSkiJumper("Piotr", "Zyla", "Poland"));
        skiJumperRepository.save(createSkiJumper("Maciej", "Kot", "Poland"));
        skiJumperRepository.save(createSkiJumper("Stefan", "Hula", "Poland"));
        skiJumperRepository.save(createSkiJumper("Janne", "Ahonen", "Finland"));
        skiJumperRepository.save(createSkiJumper("Tom", "Hilde", "Norway"));
        skiJumperRepository.save(createSkiJumper("Severin", "Freund", "Germany"));
        skiJumperRepository.save(createSkiJumper("Noriaki", "Kasai", "Japan"));

        logger.info("Registered ski jumpers:");
        for (SkiJumper skiJumper : skiJumperRepository.findAll()) {
            logger.info("Name: {} Surname: {} Country: {}", skiJumper.getName(), skiJumper.getSurname(),
                    skiJumper.getCountry());
        }
    }

    private SkiJumper createSkiJumper(String name, String surname, String country) {
        SkiJumper skiJumper = new SkiJumper();
        skiJumper.setName(name);
        skiJumper.setSurname(surname);
        skiJumper.setCountry(country);

        return skiJumper;
    }
}
Our component implements ApplicationRunner interface, if Spring Boot finds bean of this type in our classpath it will execute its run method. We can also use @Order annotation on this class to define order, but it is not necessary. In our run method we simple use our previously created SkiJumperRepository to save data to our database.
Now we are ready to create Controller to serve API for our frontend aplication.
Create file ‘SkiJumperController.java’
package pl.jlabs.tutorial.skijumpers;

import org.springframework.beans.factory.annotation.Autowired;
import org.springframework.web.bind.annotation.RequestMapping;
import org.springframework.web.bind.annotation.RequestMethod;
import org.springframework.web.bind.annotation.RequestParam;
import org.springframework.web.bind.annotation.RestController;

import java.util.ArrayList;
import java.util.List;
import java.util.Optional;

@RestController
@CrossOrigin(origins = "*")
public class SkiJumperController {

    @Autowired
    private SkiJumperRepository skiJumperRepository;

    @RequestMapping(value = "/skiJumpers", method = RequestMethod.GET)
    public List<SkiJumper> getAllSkiJumpers(@RequestParam(value = "country", required = false) Optional<String> country) {
        if (!country.isPresent()) {
            List<SkiJumper> skiJumpers = new ArrayList<>();
            skiJumperRepository.findAll().forEach(skiJumpers::add);
            return skiJumpers;
        }

        return skiJumperRepository.findByCountry(country.get());
    }

}
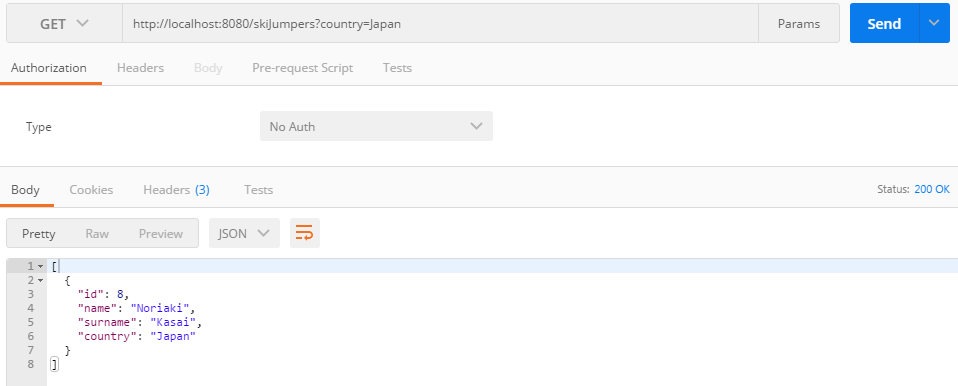
Our controller is very simple, it has one method getAllSkiJumpers with optional String parameter country. In order to serve http some resource in Spring Boot we have to create controller class, which can be done by adding annotation @RestController. RestController is a combination of two annotations: @Controller and @ResponseBody. So it means it is controller class and all methods in this class return value which will be bound to the web response body. We have another annotation here @CrossOrigin marks the annotated method or type as permitting cross origin requests. If we don’t annotate our class with this annotation we will get cross-origin error on Angular side. Our method getAllSkiJumpers have @RequestMapping annotation so it will be automatically found by Spring Boot. Its value means URI and method means HTTP method. Spring will map our method into URL like this: http://localhost:8080/skiJumpers and we can use it only with GET http method.
Additionally our method has parameter country which is annotated as @RequestParam with two parameters value = “country” and required marked as false. This means our parameter has a name country and it is optional. Finally we can also use it in this way: http://localhost:8080/skiJumpers?country=Poland
In our method body we use previously created repository to return all ski jumpers in database if parameter doesn’t exist or ski jumpers listed by country if parameter does exist. Our response (List<SkiJumper>) will be serialized by default to json. To check how it works we can use Postman:

That’s all in backend application. I hope it helps you to start creating application with Spring Boot because I think it is worth to know it. In the next part we will build a frontend side in Angular 2. I invite you to check out the next part.
Poznaj mageek of j‑labs i daj się zadziwić, jak może wyglądać praca z j‑People!
Skontaktuj się z nami


